
Toning Cyanotypes
- Alternative Processes
- Aug 16, 2022
- 3 min read
Updated: Apr 16
Because Prussian blue is nice but can get old

Do Cyanotypes Always Have to Be Blue?
Cyanotypes are often the entry point into alternative photography. Their deep Prussian blue—formed by iron compounds reacting to light—is immediately recognisable.
But that recognisability can also become a limitation.
What’s often overlooked is that cyanotype is not a fixed aesthetic—it’s a starting material. Through bleaching and toning, the image can be transformed into a wide spectrum of colours, using substances as simple as kitchen waste or plant matter.
This is where cyanotype begins to shift from a process you use to a process you work through.
Understanding the transformation: what toning cyanotype actually does
Before going into steps, it’s useful to understand what’s happening.
A finished cyanotype contains Prussian blue (iron(III) ferrocyanide). When you tone a print, you’re not just “adding colour”—you are chemically transforming or partially replacing this compound.
The process usually involves:
Bleaching → partially removing or weakening the Prussian blue
Toning → introducing tannins or other compounds that react with iron salts, forming new colour complexes
This is why toning is so variable:you are working with residual iron, paper fibres, water chemistry, and organic compounds at the same time.

BLEACHING
Purpose
Bleaching reduces the density of Prussian blue, allowing new compounds to bind more effectively during toning.
Without bleaching, toning still occurs—but tends to be weaker, more subtle, and less predictable.
What actually affects bleaching (more than the “recipe”)
Bleaching is often presented as a formula, but in practice it depends on:
Water pH
Water hardness (calcium content)
Type of bleaching agent
Print density (how dark your cyanotype is)
Duration of immersion
Common bleaching agents
Calcium carbonate (subtle, controllable — often produces more nuanced results)
Sodium carbonate (soda ash) (stronger, faster)
Ammonia (effective but can push tones toward brown)
Detergents (mild alkaline effect)
Hard tap water (sometimes enough on its own)
I prefer sodium carbonate because it's practical, faster and cheap!
Time and visual cues
Bleaching can take:
5 minutes → 45 minutes
Rather than timing alone, look for:→ the print shifting toward a uniform yellow / pale ochre tone
At this point:→ rinse immediately to stop the reaction (super important otherwise it will keep bleaching)
Over-bleaching can remove too much iron, resulting in weak or flat toning later.
TONING
What toning relies on
Most traditional cyanotype toners rely on tannins.
Tannins are plant-based compounds that:
bind to iron
form darker or warmer complexes (browns, purples, blacks)
They are found in:
bark
leaves
fruits
teas and coffee

Common toners
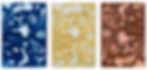
Black tea → warm browns / sepia
Coffee → deeper browns, sometimes slightly cooler
Red wine → muted purples / greys
Tannin-rich plants (oak, sumac, etc.)
These are popular because they are:
accessible
stable
relatively predictable
Beyond the obvious: unconventional toners
You can use sweet potato peels, onion pit and skin, pomegranade peels, artichokes (the external parts), sage, rosemary, anything that has high concentration of tannins! Variables that change the final colour
Instead of thinking in fixed recipes, it’s more useful to think in variables:
Bleaching intensity (light vs aggressive)
Toner concentration
Time in toner
Paper / fibre type
Residual iron in the print
Even changing just one of these can produce a completely different outcome.
I quite like not bleaching my cyanotype print to get a more dense, contrasted and deep in colour print.

From technique to practice
Cyanotype toning is often introduced as a finishing step.
But it can also be approached differently:→ as a way of extending the life of the image-making process
Instead of:
making a cyanotype → then modifying it
You begin to:
design the image with its transformation in mind
This is where it starts to connect to a broader way of working:→ treating processes as evolving, not fixed.
A note on experimentation
Working with:
kitchen waste
plant-based materials
water-dependent variables
means results are inherently inconsistent.
But that inconsistency is not a limitation—it’s what allows the process to remain open, responsive, and specific to your environment.
If you want to push this further
In the Academy, we explore:
Cyanotype in depth, including modifying density, contrast and tonal range
Cyanotype on unconventional materials, including glass, and how to tone cyanotype on glass
How small variable changes affect the outcome
Not as fixed recipes, but as a way of building a deeper understanding of the process over time.
Alternative Processes Academy Explore the Curriculum